Progress Invoicing in QuickBooks Online: Step-by-Step Instructions

Many or all of the products featured here are from our partners who compensate us. This influences which products we write about and where and how the product appears on a page. However, this does not influence our evaluations. Our opinions are our own. Here is a list of our partners and here's how we make money.
If you’re using QuickBooks for your small-business accounting needs, you’ve likely successfully created invoices for your clients. However, sometimes one invoice at the end of a project isn’t the best way for you to be compensated for your work. In that case, QuickBooks progress invoicing may be the solution. This guide will explain the process and provide step-by-step instructions for how to turn on — and successfully manage — progress invoicing in QuickBooks Online.
FEATURED
What is progress invoicing in QuickBooks Online?
In the simplest scenarios, a business is hired for a specific project or job, the work is done, and an invoice is sent to the client, which is then paid. However, not all businesses can operate with such a cut-and-dried approach. In the case of larger, long-term projects, it’s not sustainable to wait until the project is completed to receive payment — this could create a serious cash flow issue. That’s where progress invoicing comes in.
Progress invoicing, also known as progress billing, is the process of incrementally invoicing a client for work as it is completed. Thus, you will receive multiple partial payments throughout the timeline of one job, instead of one full payment at the end. In order to send progress invoices, you’ll first need to create and agree upon an estimate with your client. QuickBooks progress invoicing will be done against this estimate. You can charge either a percentage or a specific portion of the estimate in each of your progress invoices.
How to turn on progress invoicing in QuickBooks Online
Before you can start sending progress invoices in QuickBooks Online, you must first turn on this feature. Progress invoicing is supported in QuickBooks Online Simple Start, Essentials, Plus and Advanced plans. It’s important to note that while progress invoicing is available on all QuickBooks Online plans, this article will specifically deal with progress invoicing on QuickBooks Plus and Advanced plans.
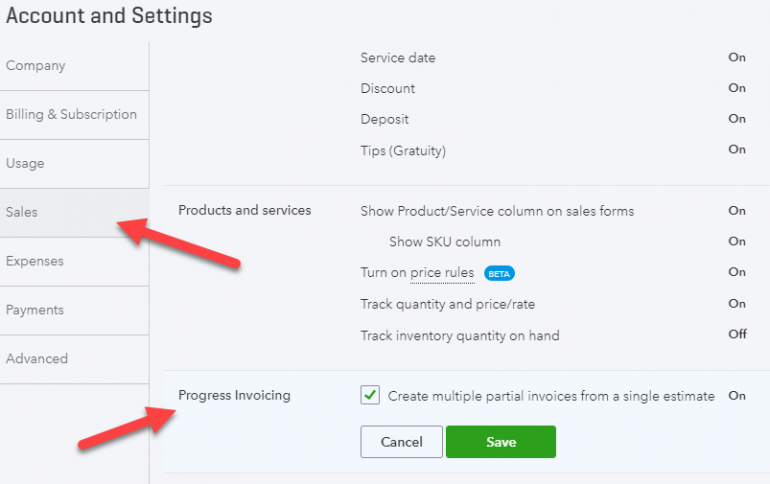
To turn on progress invoicing in QuickBooks Online, you’ll first navigate to Settings (designated by the gear icon). Next, select “Account and Settings” and select the “Sales” tab in the left-hand rail. Here, you’ll find “Progress Invoicing” in its own section underneath “Products and services.”
Check the box next to “Create multiple partial invoices from a single estimate” and then hit the “Save” button. Now, you’re all ready to start sending progress invoices from your estimates.
QuickBooks progress invoicing: A step-by-step guide
Before you can start QuickBooks progress invoicing, you must first have an estimate to invoice against. Once you have agreed upon pricing terms with your client and created an estimate in QuickBooks, you’re ready to start progress invoicing.
Step 1: Navigate to the estimate
Once your estimate has been created and approved by the client, the first step in QuickBooks progress invoicing is to select the estimate on which you’d like to create a progress invoice. To find your estimate, click on “Sales” and then “All Sales” and locate your estimate on the list.
A note on estimates: You may want to enable a “Bundle” item on your estimate if you don’t want your client to see the exact stages of the job you were hired to perform. Bundle items are like group items in QuickBooks Desktop, and are great to use when you need to hide detail on the customer-facing sales document.
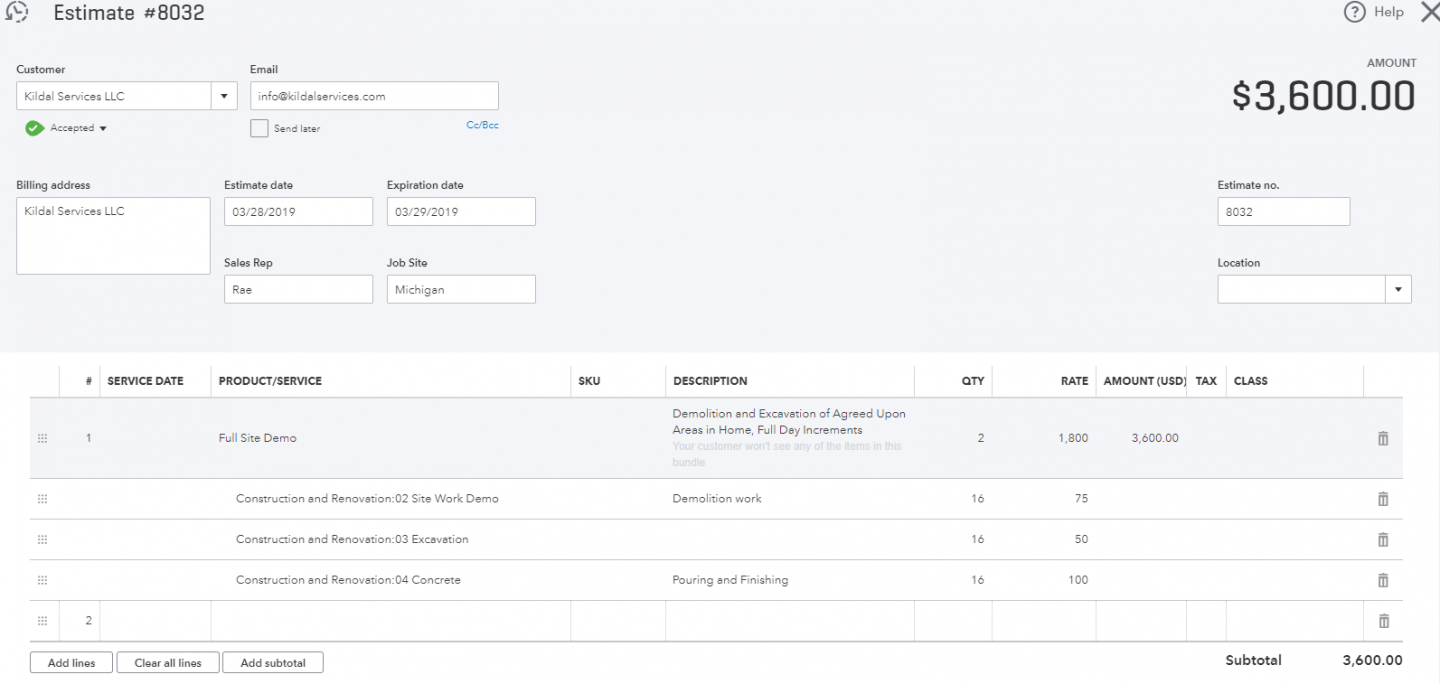
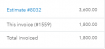
In this sample estimate, the total amount is for $3,600. To illustrate QuickBooks progress invoicing, we will create a progress invoice for 50% of the total estimate.
Step 2: Create an invoice
There are two ways to create an invoice on your estimate. If you do not want to open the estimate itself, you can select “Create Invoice” from the “Actions” column after you find the estimate in question on the list.
If you do have the estimate open, there is a “Create Invoice” button near the top right of the estimate. Select this button.
Step 3: Select an amount to invoice
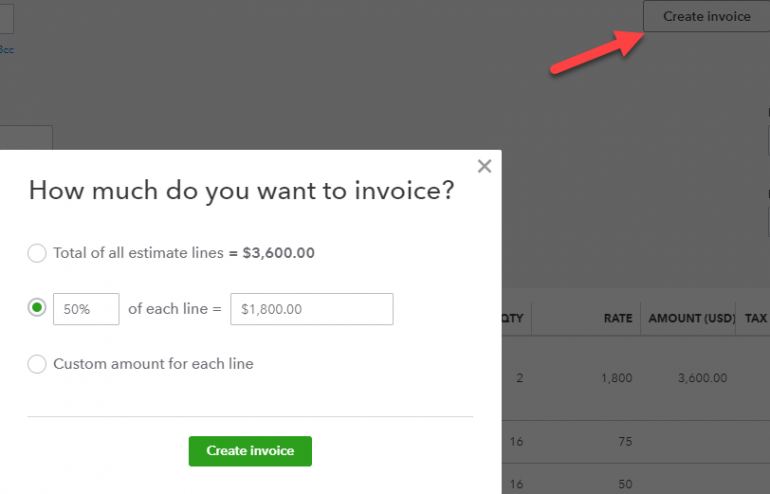
Once you have selected the “Create Invoice” button and because you have turned on QuickBooks progress invoicing, a “How much do you want to invoice” popup window with three bulleted options will appear.
From this popup you can choose to invoice for either the total of all estimate lines (you would choose this if you do not want to progress invoice), a percentage of each line (where you will input the percentage of your choice) or a custom amount for each line.
Invoice a Percentage
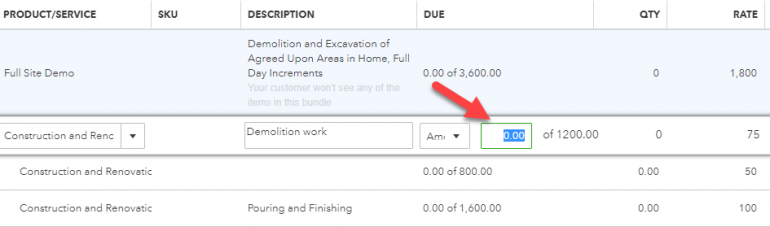
In this QuickBooks progress invoicing example, we will create an invoice for 50% of all estimate lines. Simply type in the percentage you would like to invoice for, and the total (in this case $1,800, because the total estimate is for $3,600) will appear in the box to the right.
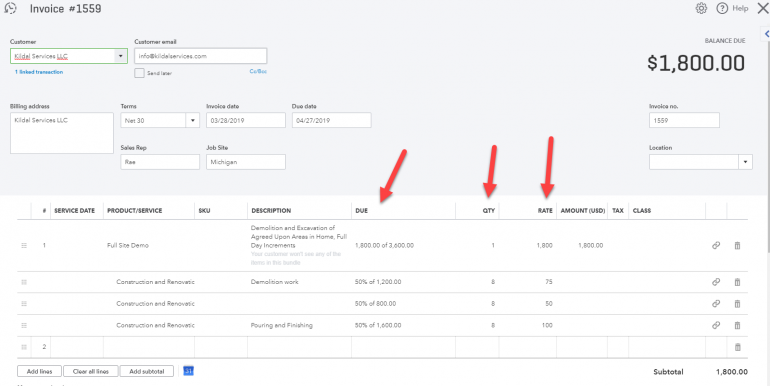
Note the “Due” column on the QuickBooks progress invoice, and how the quantity (“QTY”) and “Rate” columns are now halved:
Invoice a Custom Amount
If you do not want to invoice for a percentage of the invoice, you also have the option to input a custom amount. If you choose a custom amount for each line, you would have an option to input the “Due” amount field:
Step 4: Customize the invoice
You may be wondering how your client will be notified of the progress you’ve completed on a project when you send a progress invoice. There are some features you must turn on in the “Customize Invoice” window in order for your client to see the progress you’ve made on the project for which you’re invoicing.
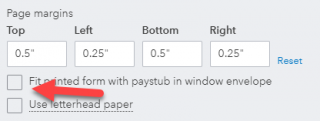
First, in the “Customize Invoice” window, on the first tab called “Design,” look for “Page margins” and uncheck the box that reads, “Fit printed form with paystub in window envelope.”
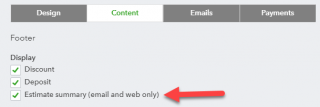
Next, navigate to the “Content” tab in the “Customize Invoice” window, click on the “Footer” section, then check the box next to “Estimate summary (email and web only).”
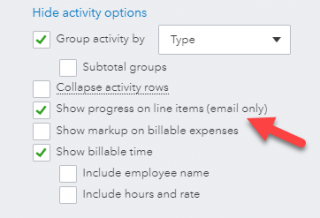
Finally, also within the “Content” tab, click on the target section of the invoice layout and check the box next to “Show progress on line items (email only).” This is shown below:
Once this is completed, save your progress invoice with either the “Save and New” or “Save and Close” options. Now, when your client receives your QuickBooks progress invoice via email, they can see the progress in the lower right of the invoice.
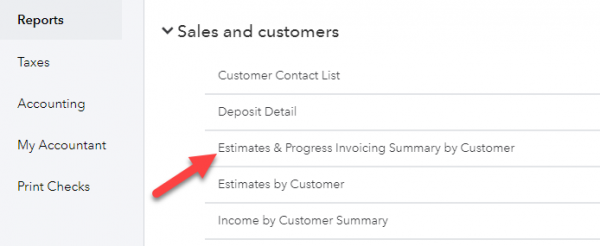
If you want to look back on your progress, this is visible in the lower-right section of the invoice and estimate. Additionally, there is a report called “Estimates & Progress Invoicing Summary by Customer,” which is a helpful resource.
This report will show all of your business’s projects in their various stages of progress. In the screenshot below, filtered for just one date, you can see the estimate of the example project we invoiced for:
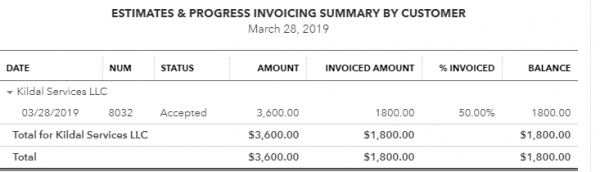
If the percentage you invoice for is directly correlated to the percentage of the project you’ve completed, you can use the “% Invoiced” column as an indicator of what percentage of the job is done, and how much still remains.
Step 5: Repeat until the estimate is closed
You will repeat this QuickBooks progress invoicing process until you have invoiced for the entire estimate and the job is complete. Keep in mind, if you try to invoice for more than the estimate total, you will only be able to add what’s left of the balance to a progress invoice. If you find that you need to bill more than the agreed-upon estimate, you will need to work with your client to update the estimate before you can invoice for the additional amount. Once you’ve invoiced for the total estimate, the status of the estimate will automatically change to “Closed.”
It’s also worth noting that if you need to edit a QuickBooks progress invoice, you will need to make those changes on the estimate itself — not on the invoice. You are able to make changes until the estimate is closed.
QuickBooks progress invoicing: The final word
QuickBooks progress invoicing is a useful tool to make sure your business has the funds it needs to successfully complete the work you were hired to do. This is especially helpful for large-scale or long-term projects that require significant time and resources that you have to pay for upfront.
QuickBooks Online resources
Read more about how QuickBooks Online works.
Bookkeeping and accounting software | |
|---|---|
QuickBooks Online $30 per month and up. Read Review. | |
FreshBooks Accounting $17 per month and up. Read Review. | |
Xero $13 per month and up. | |
Zoho Books $0 per month and up. | |
Sage 50 Accounting $48.17 per month (when paid annually) and up. | |
Wave Financial Free (add-ons available). | |


A version of this article was first published on Fundera, a subsidiary of NerdWallet.
On a similar note...

| Product | Starting at | Promotion | Learn more |
|---|---|---|---|
 QuickBooks Online NerdWallet Rating Learn more on QuickBooks' website | $30/month Additional pricing tiers (per month): $60, $90, $200. | 50% off for first three months or free 30-day trial. | Learn more on QuickBooks' website |
 Xero NerdWallet Rating Learn more on Xero's website | $15/month Additional pricing tiers (per month): $42, $78. | 30-day free trial or monthly discount (terms vary). | Learn more on Xero's website |
 Zoho Books NerdWallet Rating Learn more on Zoho Books' website | $0 Additional pricing tiers (per month): $20, $50, $70, $150, $275. | 14-day free trial of the Premium plan. | Learn more on Zoho Books' website |
 FreshBooks NerdWallet Rating Learn more on FreshBooks' website | $19/month Additional pricing tiers (per month): $33, $60, custom. | 30-day free trial or monthly discount (terms vary). | Learn more on FreshBooks' website |
