How to Enter Credit Card Charges in QuickBooks Online


Many, or all, of the products featured on this page are from our advertising partners who compensate us when you take certain actions on our website or click to take an action on their website. However, this does not influence our evaluations. Our opinions are our own. Here is a list of our partners and here's how we make money.
Entering your credit card charges in QuickBooks Online is quick and simple. The hardest part is determining your process for entering the charges.
If you can’t decide which method to use, consult with your accountant or a QuickBooks ProAdvisor. They will be able to assess your business as a whole and advise you on which method will work best for your business.
There are three primary ways to enter credit card charges in QuickBooks Online.
advertisement
Method 1: Enter the transaction and then match to the bank feed.
Entering your credit card purchases into QuickBooks Online and then matching that transaction to the bank feed is the best method, at least from a bookkeeping standpoint. It’s also the least commonly used method.
Traditionally, bookkeepers entered transactions into ledgers from source documents (like receipts) and then reconciled these ledgers to the bank or credit card statement each month. The advent of bank feeds in accounting software has provided a way to reconcile accounts almost in real-time. Although you do still want to complete a thorough reconciliation of your accounts each month, the real-time reconciliation facilitated by bank feeds has sped up this process considerably.
Bank feeds have also expedited the data entry process. But even though using bank feed technology increases the speed and accuracy of your bookkeeping, it also circumvents the check and balances that have traditionally been the core of bookkeeping.
It's not wrong to depend on bank feed technology to enter credit card charges in QuickBooks Online, but it’s important to highlight this more traditional (and technically correct) method of bookkeeping.
To use this method:
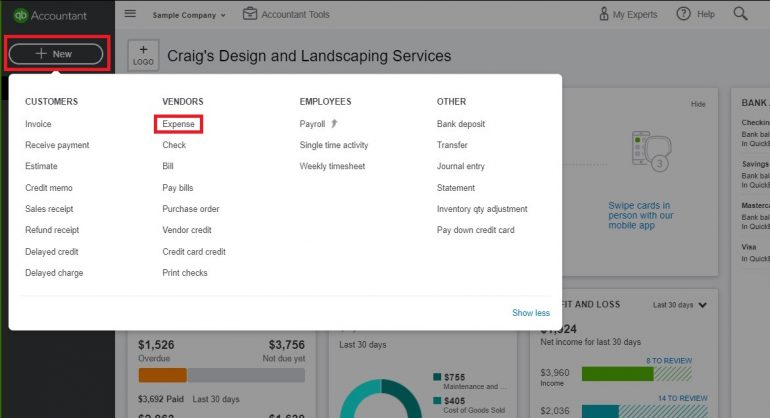
1. From the Dashboard, click the New button, then click Expense under Vendors.
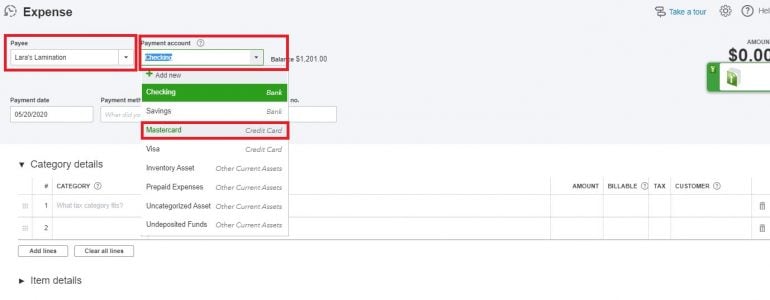
2. Enter the Payee name and select the credit card used for the transaction from the Payment Account drop-down.
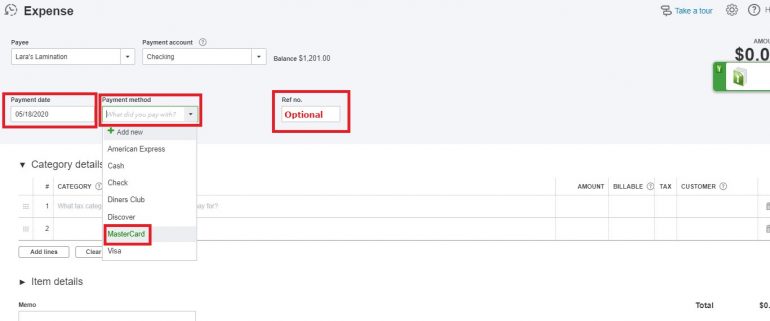
3. Enter the date of the transaction in the Payment Date field, then select the correct payment method. Enter a reference number if desired.
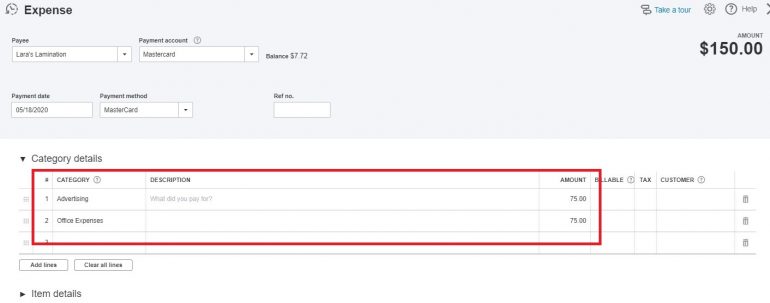
4. Complete the rest of the transaction, entering the category to post it to, a description if necessary and the amount of the transaction. You can split the transaction between categories (accounts in your chart of accounts) by entering multiple lines. For this example, let's split the $150.00 transaction evenly between Advertising and Office Expenses. Ignore the Billable, Tax and Customer fields in this example.
5. (Optional) Attach a receipt by dragging and dropping an image into the Attachments box. You can also click into this box and search your computer for the image. If you have previously uploaded attachments into QuickBooks Online, you can click the “Show Existing” link to open a right sidebar and add that attachment to the expense.
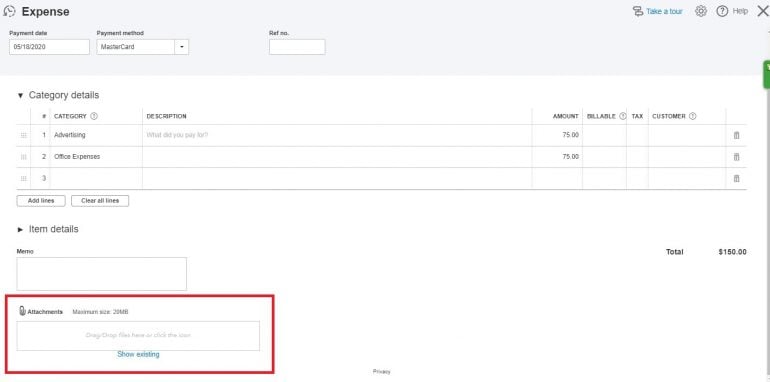
6. When you are done editing the transaction, click the Save and Close button.

Using the Receipts feature
You can expedite this method of entry by using the Receipts feature in QuickBooks Online.
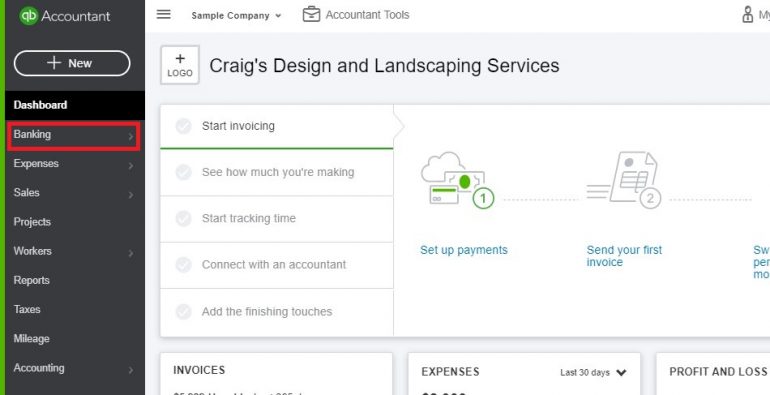
1. From the Dashboard, click Banking.
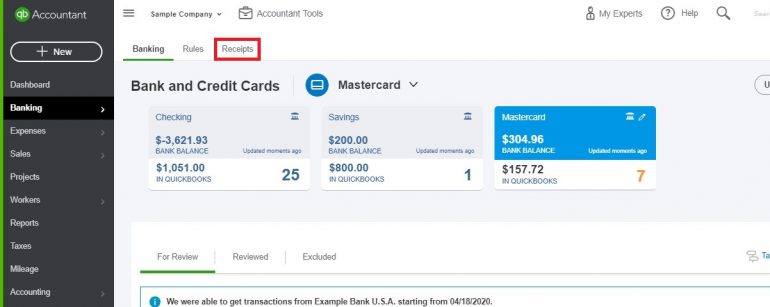
2. On the next screen, click Receipts.
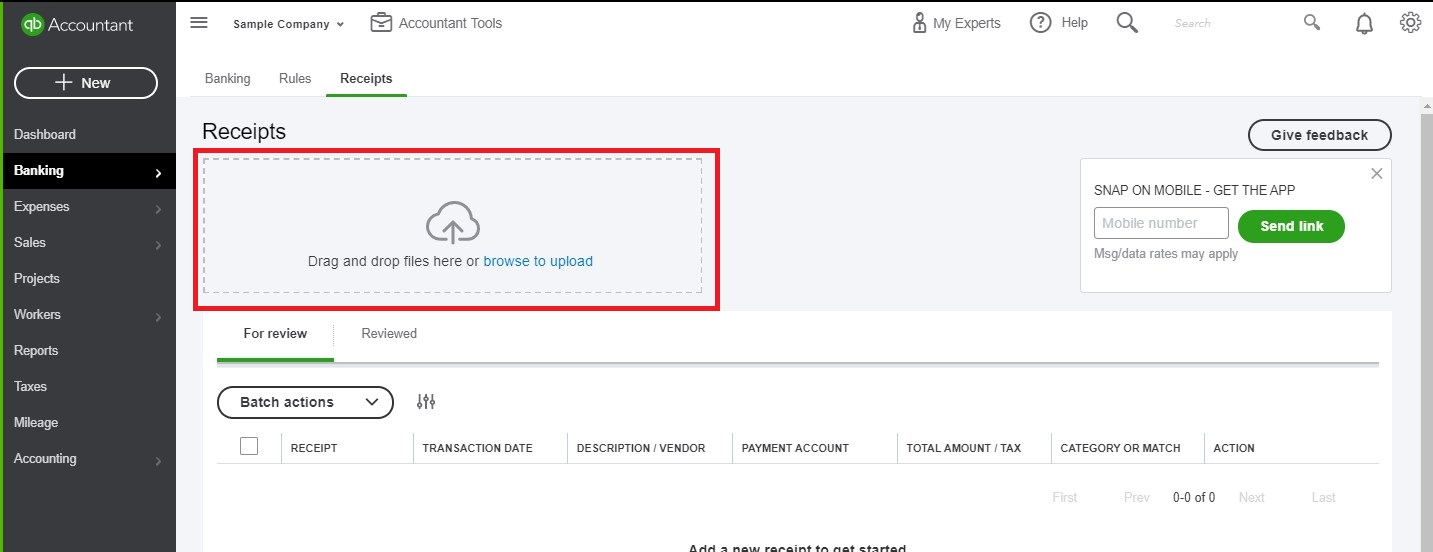
3. Once on the Receipts screen, you can upload receipts. If you’re using the QuickBooks Online app on your smartphone, you can use the app to add photos of receipts, then access and add them to your books from this screen.
Regardless of whether you use the first or the second method to enter your credit card charges, once entered you can now match the transaction from the Banking screen.
Note that the date of the transaction in the bank feed will always be a day or two later than the date of the transaction. This is because it takes a little bit of time for the transaction to “settle,” or be finalized, before it hits your credit card account.
Method 2: Enter transactions from bank feed or import.
Not every business owner will use the first method to enter their credit card charges in QuickBooks Online. In fact, most choose to simply connect the credit card account to QuickBooks Online and enter credit card transactions from the bank feed. Here’s how:
Connect your credit card to QuickBooks Online. You can also import your transactions if you can’t get a direct bank feed or if you need to enter transactions that occurred too long ago for the bank feed to include them.
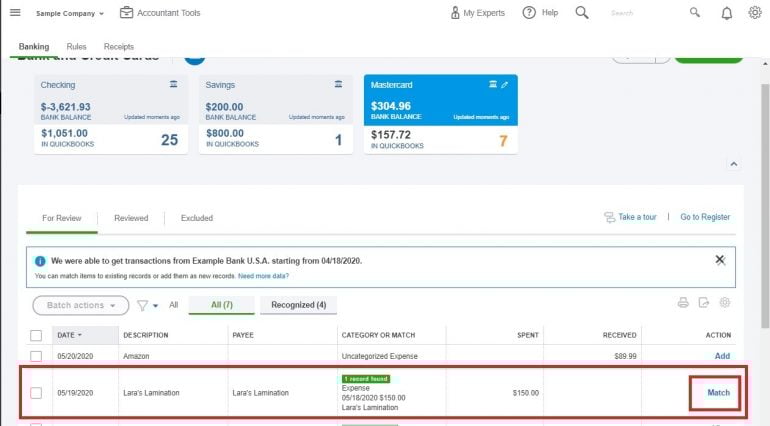
After your transactions have been imported — either from your bank or from a manual import — use the Banking screen to classify them. You’ll notice you have options to add, view or match the transactions in your bank feed. If you follow the first method for entering your credit card transactions, you’ll use the Match feature more often than not. However, you want to make sure you are matching the right transaction.
Match
Click into the transaction to expand it. You can click anywhere in this line except the “Match” link or the checkbox to the left of the transaction to expand the transaction.
Review the transaction thoroughly. You want to make sure everything makes sense. Does the Bank Detail line coincide with the Payee name? Is the date accurate? If you aren’t sure, you can click on the link — in this case, “CC Expense” — to review the transaction in more detail. You can also click the “Find other records” button to view other possible transactions that could be linked to this one.

Once you are confident in the match, click the Match button.

It’s important to note you aren’t adding a transaction here. You’re simply matching a transaction you’ve already entered to the transaction in the bank feed — in short, reconciling it.
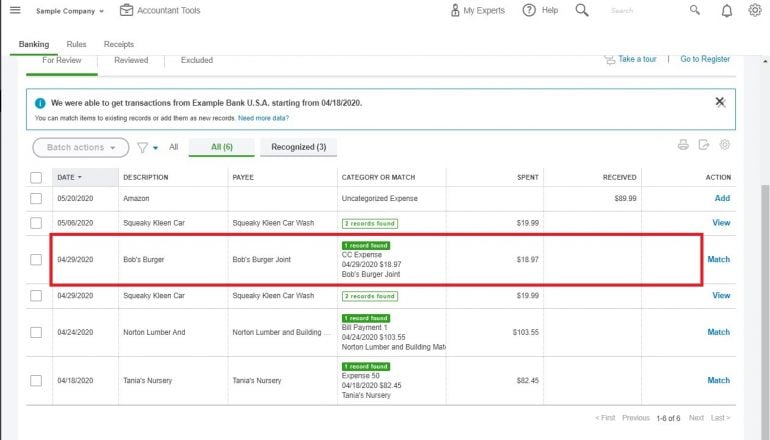
View
The View function appears when QuickBooks Online identifies more than one previously entered transaction that could be linked to the transaction in the bank feed. To see the transactions, click the “View” link to expand the details.

From the expanded view, choose the radio button next to the correct transaction, then click Match.

Add
If you haven’t previously entered data for credit card transactions in QuickBooks Online, you can add transactions on the fly from the bank feed.
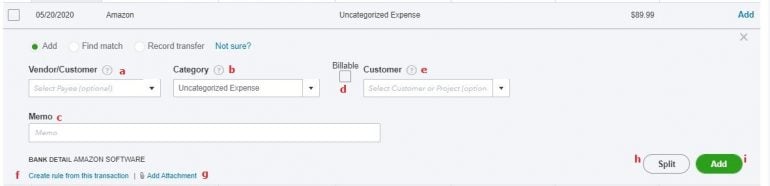
Click into the transaction as shown under the Match section to expand it. You’ll notice more fields and options in this expanded view than those for Match and View. In fact, this is essentially a shorter version of the Expense screen shown in the first method for entering credit card charges we covered.
Enter the vendor’s name (a), the expense category (b) and a memo (c), if desired. If this expense is billable to a customer, click the Billable checkbox (d) and enter the name of the customer to be billed (e).
If this is a recurring transaction — say, a rent payment — you can click on the “Create rule from this transaction” link (f) to open the rules screen. You can also add an attachment to the transaction (g).
Often, you will need to split a transaction over multiple expense categories, and you can do that here by clicking on the Split button (h). Once you are done, click the Add button (i) to add the transaction to QuickBooks Online.
Method 3: Enter credit card charges directly into the credit card register.
If you don’t want to use the expense entry method or the bank feed/import method, you can enter credit card charges directly into the credit card register.
When would you use this method? Let’s say you only used a credit card for a brief amount of time. You’ve closed the account, so you can’t connect the bank feed or get an Excel or CSV file to import, and there aren’t that many transactions, anyway.
Here’s how you can quickly enter your transactions directly into the credit card register:
1. Set up the credit card. From the Dashboard, hover over Accounting and then click Chart of Accounts.

2. Click the New button on the next screen.

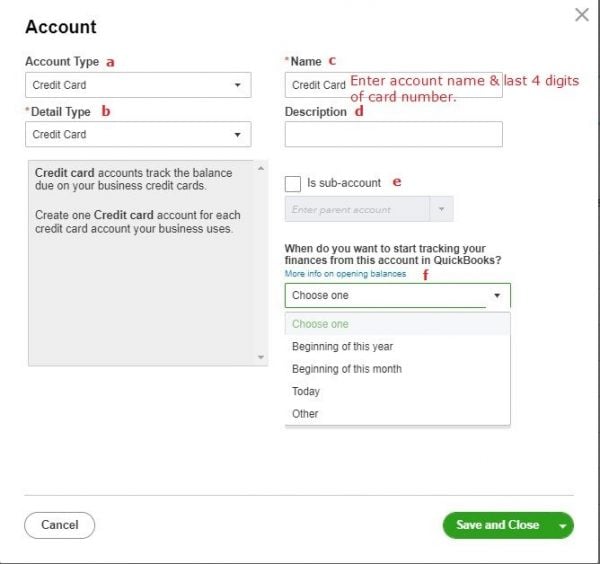
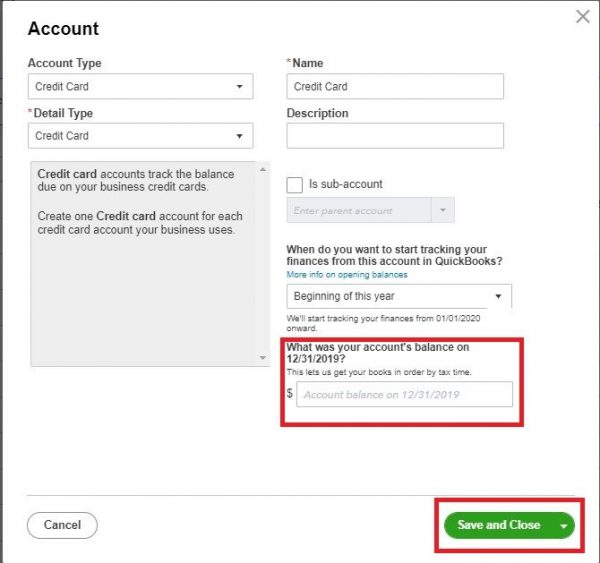
3. You’ll now see a pop-up window. Set the Account Type (a) to credit card. The Detail Type (b) will automatically update, and the name field (c) will default to “Credit Card.” Change the name of the credit card to the account name and the last four digits of the card number.
A description (d) isn’t necessary unless you want to enter a note about the card. You’ll typically not use the Sub-Account (e) feature for a credit card, either.
The last field on this screen is the opening balances field (f). Use the drop-down menu to choose the earliest date you used the card.
Now, you’ll be asked to enter your account’s balance as of the date you chose. If you are entering a new card, set this field to $0. If the card was in use before the date you started using it for business, consult with your accountant before proceeding to ensure your balance sheet remains accurate. After you’ve entered your beginning balance, click Save and Close.
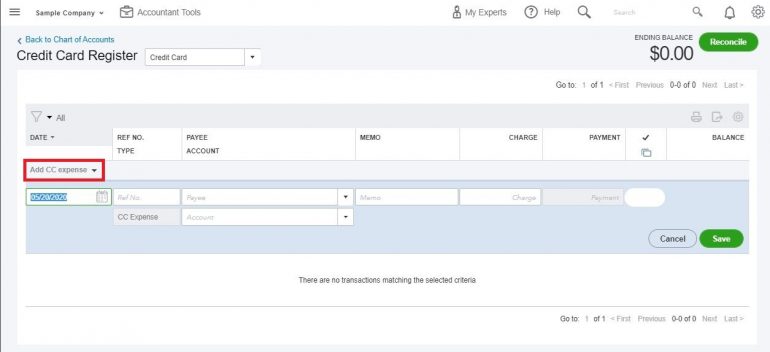
4. The pop-up window will close, and you will be back at your Chart of Accounts screen. Locate the account you just created in the Chart of Accounts list, and click View Register.

5. You will now be taken to the Credit Card Register screen for the credit card you just created. Click on the “Add CC Expense” link to expand your first data entry line.
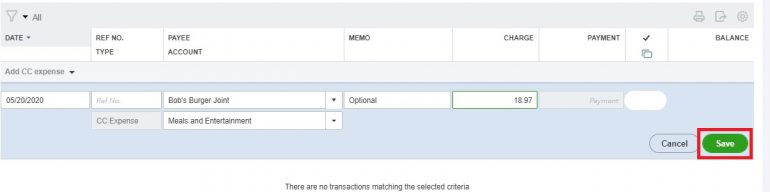
6. Complete each field, making sure the date field is accurate. The only optional fields are the “Ref No.” field and the “Memo” field — every other field should be completed. Once done, click the Save button.
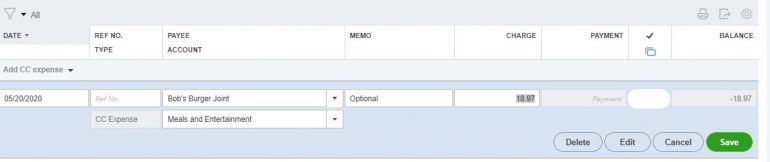
7. Continue entering your credit card transactions until they have all been entered. If you discover you’ve made a data entry error, click back into the line with the error and then click on Edit to change it. You can also delete a transaction if you enter it in error.
8. If you need to enter a credit card payment, click on the down arrow by the “Add CC expense” option and change the option to “CC Credit.” It’s very important to make sure you are using the correct transaction type: CC Expense is for purchases with your card, and CC Credit is for payments on the card’s balance.
Note: When you enter a credit card payment, enter the bank account from which the payment was made in the Account field.

9. Once you have entered all your credit card charges and payments, click the Reconcile button to reconcile your account. This helps you ensure you haven’t made a data entry error.
Credit card transactions vs. debit card transactions
When you use a credit card to pay for a purchase, you create a short-term liability for your business. Even though your credit card account will appear in the Banking screen along with your checking account in QuickBooks Online, your credit card actually functions like a loan to your business.
For example, let’s say you pay your rent using your business credit card. Behind the scenes, the transaction looks like this:
Debit: Rent Expense $1,200
Credit: Credit Card Account $1,200
Because your credit card is a liability account, and because liability accounts are increased by credits, the credit of $1,200 increases the amount of the liability (the amount you owe).
Paying for purchases using your debit card, on the other hand, is much like paying with a check. When you make a payment using your debit card, your checking account is reduced by the amount of the purchase.
Again, let’s say you pay your rent using your business debit card. At first glance, this transaction looks almost identical to the one above:
Debit: Rent Expense $1,200
Credit: Checking Account $1,200
However, there are two big differences:
Unlike liabilities, assets are reduced by credit transactions. Now the credit of $1,200 is reducing your assets (checking account) instead of increasing your liabilities.
This transaction is posting directly to your checking account and not to a separate debit card account. Remember, your debit card works like a check: It’s a payment instrument, not a completely different payment account.
The big takeaway from this section is that you should not enter debit card transactions as though they are credit card transactions, nor should you post credit card transactions directly to your checking account, even if you pay your credit card balance each month. Credit card transactions are posted to a liability account you will create for your credit card, and debit card transactions are posted to your checking account.
QuickBooks Online resources
Read more about how QuickBooks Online works.
A version of this article was first published on Fundera, a subsidiary of NerdWallet.

| Product | Starting at | Promotion | Learn more |
|---|---|---|---|
 QuickBooks Online NerdWallet Rating Learn more on QuickBooks' website | $30/month Additional pricing tiers (per month): $60, $90, $200. | 50% off for first three months or free 30-day trial. | Learn more on QuickBooks' website |
 Xero NerdWallet Rating Learn more on Xero's website | $15/month Additional pricing tiers (per month): $42, $78. | 30-day free trial or monthly discount (terms vary). | Learn more on Xero's website |
 Zoho Books NerdWallet Rating Learn more on Zoho Books' website | $0 Additional pricing tiers (per month): $20, $50, $70, $150, $275. | 14-day free trial of the Premium plan. | Learn more on Zoho Books' website |
 FreshBooks NerdWallet Rating Learn more on FreshBooks' website | $19/month Additional pricing tiers (per month): $33, $60, custom. | 30-day free trial or monthly discount (terms vary). | Learn more on FreshBooks' website |
