Understanding the Parts of a Check
Many, or all, of the products featured on this page are from our advertising partners who compensate us when you take certain actions on our website or click to take an action on their website. However, this does not influence our evaluations. Our opinions are our own. Here is a list of our partners and here's how we make money.

Parts of a Check
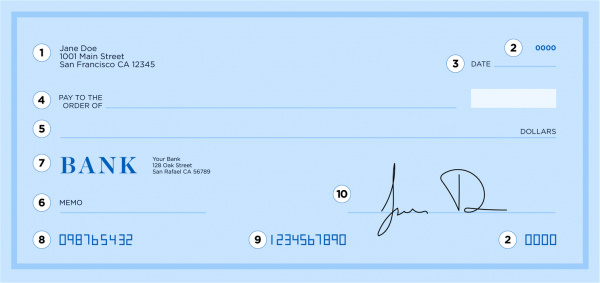
Though checks are being used less frequently in the digital age of payment apps and automated bill pay, they can still be a handy method of making official payments or sending money through the mail. You can also use them to look up information like your bank routing number and check account number, which you'll need for certain transactions, such as setting up direct deposit or linking to a payment app like Venmo. Here are the different parts of a check to know when you're filling out or depositing a check.
1. Your information
In the upper left corner of your check, you’ll typically find the name and the address you have on file with your bank. If you’ve moved and no longer live at that address, you should still be able to use the checks as long as your account number has stayed the same.
2. Check number
Located in the upper and lower right corners of the check, the check number is used for tracking. For example, if your checkbook is stolen, you can report to the bank which numbered checks were taken (e.g., check numbers 1 to 100), so that the bank can identify fraudulent check withdrawals.
3. The date
When writing a check, you should put the date of the transaction on the date line. If you’re trying to postdate a check — where you don’t want the recipient to withdraw funds from your account before a certain date — keep in mind that writing the check date for the future might not delay your recipient’s ability to deposit the check earlier.
4. The recipient's name
The top long line in the middle of the check, usually preceded by “pay to the order of,” is where you write out the recipient’s name. The recipient can be either a person or an organization.
You can also pay to the order of "Cash,” which means anyone can cash the check. This may be a convenient option if you don’t know a payee’s name, but you don’t have any control over who cashes the check. It’s typically a better idea to write down a specific recipient’s name.
5. The payment amount
There are two spots on the check where you'll write the payment amount. The first is in the box in the middle of the right-hand side, just after the recipient's name, where you’ll write the amount numerically (e.g., “$50.50”). The second is on the long line below the recipient’s name, where you’ll write out the amount in words (e.g., “Fifty and fifty cents” or “Fifty and 50/100”). This helps the bank clarify the total amount in case either the words or number amounts are hard to decipher.
6. Memo line
Filling out this line, in the bottom left corner, is optional but recommended. You can write something like “June rent” or “summer camp fees.” It helps your recipient know what the check is payment for, and it can help you remember what it was for when you’re looking over your finances later.
7. Bank name
In this area, you'll typically find your bank's logo and/or address.
8-9. Routing and account number
Along the bottom of the check you’ll see a string of numbers. You'll need to reference these numbers when doing things like setting up direct deposit or ordering checks.
Bank routing number
The first set of numbers is the routing number, which is the identity of your bank within the banking system (and usually denotes regional location as well).
Account number
The second set of numbers is your account number, for the account from which funds will be withdrawn; it's unique to your account.
10. Signature
On the bottom right corner of the front of a check there’s a blank line that you must sign. This signature indicates that you’ve given permission for the funds to be withdrawn from your account.
How to endorse a check that you’ve received from someone else
If you flip over a check that you’ve received, you’ll see a blank line on the back at the top of one of the short ends. When you’re ready to deposit a check through an ATM, with a bank teller or via a mobile banking app, sign your name on the blank line. This indicates that you’re the intended recipient and that you’ve authorized the deposit.

