Hillary Crawford writes about small-business software at NerdWallet and is certified in QuickBooks Online and web design. Her previous roles include news writer and associate West Coast editor at Bustle Digital Group, where she helped shape news and tech coverage. She's appeared on Cheddar News and also worked as a policy contributor for GenFKD. Hillary earned a bachelor's degree with high honors in political science from the University of Michigan.
Email: <a href="mailto:hcrawford@nerdwallet.com">hcrawford@nerdwallet.com</a>.
Ryan Lane is an editor on the small-business team and a NerdWallet authority on student loans. He spent more than a decade as a writer and editor for student loan guarantor American Student Assistance and was a managing editor for publisher Cell Press. Ryan’s work has been featured by The Associated Press, USA Today and MarketWatch, and he previously co-authored the U.S. News & World Report Student Loan Ranger blog. Email: <a href="mailto:rlane@nerdwallet.com”">rlane@nerdwallet.com</a>.
Ryan Lane is an editor on the small-business team and a NerdWallet authority on student loans. He spent more than a decade as a writer and editor for student loan guarantor American Student Assistance and was a managing editor for publisher Cell Press. Ryan’s work has been featured by The Associated Press, USA Today and MarketWatch, and he previously co-authored the U.S. News & World Report Student Loan Ranger blog. Email: <a href="mailto:rlane@nerdwallet.com”">rlane@nerdwallet.com</a>.
NerdWallet's content is
fact-checked for accuracy, timeliness, and relevance by humans.
It undergoes a thorough review process involving writers and editors to ensure
the information is as clear and complete as possible. Learn more by checking
our
Editorial Guidelines.
Content was accurate at the time of publication.
Why trust NerdWallet
250+ small-business products reviewed and rated by our team of experts.
80+ years of combined experience covering small business and personal finance.
75+ categories of best business software selections.
NerdWallet's small-business software content, including ratings, recommendations and reviews, is overseen by a team of writers and editors who specialize in business software, including payroll, accounting and payment processing. Their work has appeared in The Associated Press, The Washington Post, Nasdaq, Entrepreneur, ABC News, Yahoo Finance and other national and local media outlets. Each writer and editor follows NerdWallet's strict guidelines for editorial integrity to ensure accuracy and fairness in our coverage.
Advertiser disclosure
You're our first priority.
Every time.
We believe everyone should be able to make financial decisions with
confidence. While we don’t cover every company or financial product on
the market, we work hard to share a wide range of offers and objective
editorial perspectives.
So how do we make money? Our partners compensate us for advertisements
that appear on our site. This compensation helps us provide tools and
services - like free credit score access and monitoring. With the
exception of mortgage, home equity and other home-lending products or
services, partner compensation is one of several factors that may affect
which products we highlight and where they appear on our site. Other
factors include your credit profile, product availability and
proprietary website methodologies.
However, these factors do not influence our editors’ opinions or ratings, which are based on independent research and analysis. Our partners cannot
pay us to guarantee favorable reviews.
Here is a list of our partners.
Hillary Crawford writes about small-business software at NerdWallet and is certified in QuickBooks Online and web design. Her previous roles include news writer and associate West Coast editor at Bustle Digital Group, where she helped shape news and tech coverage. She's appeared on Cheddar News and also worked as a policy contributor for GenFKD. Hillary earned a bachelor's degree with high honors in political science from the University of Michigan.
Email: <a href="mailto:hcrawford@nerdwallet.com">hcrawford@nerdwallet.com</a>.
Ryan Lane is an editor on the small-business team and a NerdWallet authority on student loans. He spent more than a decade as a writer and editor for student loan guarantor American Student Assistance and was a managing editor for publisher Cell Press. Ryan’s work has been featured by The Associated Press, USA Today and MarketWatch, and he previously co-authored the U.S. News & World Report Student Loan Ranger blog. Email: <a href="mailto:rlane@nerdwallet.com”">rlane@nerdwallet.com</a>.
Ryan Lane is an editor on the small-business team and a NerdWallet authority on student loans. He spent more than a decade as a writer and editor for student loan guarantor American Student Assistance and was a managing editor for publisher Cell Press. Ryan’s work has been featured by The Associated Press, USA Today and MarketWatch, and he previously co-authored the U.S. News & World Report Student Loan Ranger blog. Email: <a href="mailto:rlane@nerdwallet.com”">rlane@nerdwallet.com</a>.
NerdWallet's content is
fact-checked for accuracy, timeliness, and relevance by humans.
It undergoes a thorough review process involving writers and editors to ensure
the information is as clear and complete as possible. Learn more by checking
our
Editorial Guidelines.
Content was accurate at the time of publication.
Why trust NerdWallet
250+ small-business products reviewed and rated by our team of experts.
80+ years of combined experience covering small business and personal finance.
75+ categories of best business software selections.
NerdWallet's small-business software content, including ratings, recommendations and reviews, is overseen by a team of writers and editors who specialize in business software, including payroll, accounting and payment processing. Their work has appeared in The Associated Press, The Washington Post, Nasdaq, Entrepreneur, ABC News, Yahoo Finance and other national and local media outlets. Each writer and editor follows NerdWallet's strict guidelines for editorial integrity to ensure accuracy and fairness in our coverage.
Advertiser disclosure
You're our first priority.
Every time.
We believe everyone should be able to make financial decisions with
confidence. While we don’t cover every company or financial product on
the market, we work hard to share a wide range of offers and objective
editorial perspectives.
So how do we make money? Our partners compensate us for advertisements
that appear on our site. This compensation helps us provide tools and
services - like free credit score access and monitoring. With the
exception of mortgage, home equity and other home-lending products or
services, partner compensation is one of several factors that may affect
which products we highlight and where they appear on our site. Other
factors include your credit profile, product availability and
proprietary website methodologies.
However, these factors do not influence our editors’ opinions or ratings, which are based on independent research and analysis. Our partners cannot
pay us to guarantee favorable reviews.
Here is a list of our partners.
Many or all of the products on this page are from partners who compensate us
when you click to or take an action on their website, but this does not
influence our evaluations or ratings. Our opinions are our own.
QuickBooks Online
The bottom line:
QuickBooks Online is an industry leader when it comes to accounting software. After testing it, we can confirm that it has the ability to accommodate small businesses with more complex accounting needs. However, users say the company’s price hikes and poor customer support are pushing them away. Unfortunately, few alternatives are as feature rich.
Xero: Better usability. If you don’t have much experience with accounting software, you might prefer Xero’s simpler user interface. You can still drill down into reports when you need to, but we find the software’s layout a little less overwhelming. Read our full Xero review.
Zoho Books: Better price point. Zoho Books has a range of plans that are often less expensive than QuickBooks Online. There’s even a free option. It also has in-house solutions for customer relationship management software, marketing and human resources. Read our full Zoho Books review.
FreshBooks: Better customer support ratings. FreshBooks receives significantly higher ratings than QuickBooks on certain review sites, like Trustpilot. A lot of FreshBooks’ positive reviews praise its customer support. And when they don’t, FreshBooks responds. That doesn’t guarantee you’ll get good service. But we do think it’s a positive that FreshBooks engages with its users in such channels. (QuickBooks ignores those reputation sites.) Read our full FreshBooks review.
Intuit’s QuickBooks Online is the industry standard for small-business accounting software. Its range of features, including its granular reporting tools, can support very small operations and growing companies alike. It’s an especially easy fit for businesses that plan to regularly work with bookkeepers or accountants.
In terms of features, QuickBooks Online is a five-star product. Its capabilities are top of the line. But when you wade into the harder-to-quantify world of user reviews, you might notice frustration with the platform is very common, despite its reach. Additionally, QuickBooks Online can be expensive, even more so if your business adds on time tracking or payroll.
Several competitors offer simpler, more affordable alternatives to QuickBooks Online. Consider those options if you have a very small business or are worried about customer support.
QuickBooks Online is best for:
✔️ Growing businesses.
✔️ Detailed reporting.
✔️ In-depth transaction tracking.
QuickBooks plan pricing and features
Promotional discounts may apply. QuickBooks Online lets new customers choose between a 30-day free trial or 50% off for three months.
Simple Start
Essentials
Plus
Advanced
$38
$75
$115
$275
Access for 1 user and 2 accounting firms.
Track income and expenses.
General reports.
Send invoices and accept payments.
Sort income and expenses into tax categories.
Run and export financial reports.
Upload or email receipts on the go with the QuickBooks mobile app.
Automatically track miles with your smartphone’s GPS.
Monitor and manage cash flow.
Customize and send estimates.
Manage 1099 contractor payments.
Sync one sales channel with QuickBooks.
Manage and pay bills.
Everything in the Simple Start plan, plus:
Enhanced reports.
Sync 3 sales channels.
Record transactions in multiple currencies.
Access for 3 users.
Add employee time to invoices.
Tools for collecting testimonials and feedback.
Everything in the Essentials plan, plus:
Inventory reports and enhanced sales and profitability reports.
Sync all of your sales channels.
Access for 5 users.
Inventory tracking.
Project profitability.
Ability to create budgets.
Everything in the Plus plan, plus:
Customizable report dashboards.
Access for 25 users.
Automatically track value of fixed assets.
Sync with Excel.
Batch invoices and expenses.
Assign custom permissions to each user.
Create workflows.
Priority Circle support seven days per week.
Automatically track deferred revenue.
Forecasting tools.
Additionally, you can access more than 750 third-party app integrations with all plans. These include popular e-commerce choices like Shopify, Squarespace and Wix. It also syncs with some of our top POS system picks, like Square and Clover. If you use Toast, however, you currently need to pay extra to integrate with QuickBooks Online.
🤓
Nerdy Tip
Need accounting software for your side hustle? QuickBooks offers QuickBooks Solopreneur,accounting software designed for freelancers and independent contractors, with plans starting at $20 per month.
NerdWallet checked online forums like Reddit and reviews from sites like TrustPilot, G2, the App Store and Google Play to gauge how users feel about QuickBooks. We used an AI tool to help analyze this feedback. Here are the major trends we spotted.
👍 Depth of features
I’ve talked with business owners who strongly dislike QuickBooks Online, but stick with it for the in-depth feature set. They say it’s hard to find a different product with all of the tools they’re used to having with QuickBooks Online. Xero has a lot of those same tools, but its interface is much different.
Overall, QuickBooks Online’s mobile app receives positive ratings on the App Store and Google Play. Users appreciate the app’s easy invoicing features and the ability to upload and scan receipts.
However, when you compare ratings over time, it’s clear that online reviewers have become less satisfied with the app over the past year or so. They say it can be laggy and complain about technical issues. For example, some have problems loading certain features, like the mileage tracker.
QuickBooks’ developer team responded to many of these negative reviews with fixes and troubleshooting tips. They’ve also issued well over a dozen app updates since January 2025. It’s unclear whether these updates have solved online reviewers’ issues, but it shows that they’re at least making attempts.
👎 Customer support
You can’t fault QuickBooks Online for the number of support channels it offers. But an overwhelming number of online reviews criticize the quality of the help they receive.
Some say they spend hours on the phone and still aren’t able to resolve their problems. Others complain that the company’s started leaning more heavily into AI chatbots, despite each plan including phone support.
If you’re worried about customer support, you might consider FreshBooks. Like QuickBooks Online, it offers help via phone and live chat. Its service has naysayers online, too — every accounting software does. But we generally see more positive ratings and reviews for FreshBooks than QuickBooks Online. For example, FreshBooks receives 3.9 stars on Trustpilot, as of this writing, whereas QuickBooks receives 1.1 stars.
Multiple users say they’ve had issues with how QuickBooks Online processes — and in some cases, apparently holds — payments. Some users say QuickBooks Online initiated unauthorized ACH payments and immediate transfers without permission. Others say the company froze their entire account after they received or transferred large, but legitimate payments.
We see these kinds of complaints with most payment processors (and many business banks, too). But you may have more luck, and get better help, with a company that has a stronger focus on payments.
QuickBooks Online users don’t appreciate the company’s frequent upselling and price hikes, especially with what they perceive as declining customer support quality. The company most recently increased plan prices in August 2024, from $30 to $35 for the base-level Simple Start Start Plan and from $200 to $235 for the highest-tier Advanced plan. If cost is a sticking point for you, Zoho Books is our current pick for best free accounting software.
Our experience testing QuickBooks
👋 I'm Hillary Crawford, a lead writer and content strategist for NerdWallet. I've been covering small-business accounting software since 2021 and am QuickBooks certified. I did the testing for QuickBooks Online.
To do that, I test drove QuickBooks Online’s demo account and evaluated key components within the Advanced plan in April 2025. I also drew off of what I know from helping my husband set up his own QuickBooks Online account. Here’s what stood out.
My take: Love the customizability, but undecided on the AI features.
QuickBooks Online’s dashboard gives you a complete bird’s eye view of how your business is doing. If you’re new to bookkeeping, all of the information might be overwhelming. To fix that, you can customize the dash and remove the modules you don’t need.
Dashboard customization screen.
After I clicked the “customize layout” button, a banner popped up asking me if the feature was helpful. I clicked the “thumbs up” icon, and another banner replaced the initial one. As you can see above, it asked if I had time to provide more information. Personally, I found this to be a bit annoying. There’s already enough to parse through without the added clutter.
There’s also a new dashboard tab called “Business Feed” that shows AI-generated notifications for things like overdue invoices. It provides guidance if you’re not sure how to catch up on your bookkeeping tasks, too. But I’m undecided on whether these actually add value.
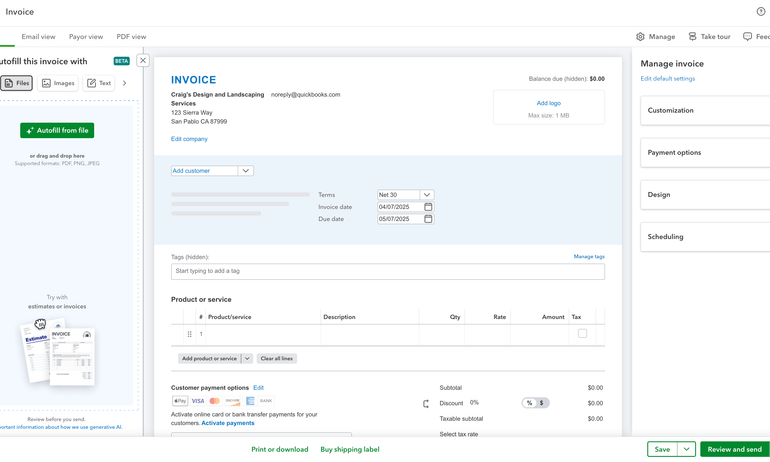
My take: Can be as detailed as you need it to be.
QuickBooks Online’s invoicing interface gives you lots of options. You can customize which columns you want to show, add your company’s logo and mark invoices as “recurring” in the “scheduling” dropdown box.
Though there’s a lot going on, the “manage invoice” dropdown boxes make it easy to ensure you aren’t forgetting any details. I also like that you can choose to toggle between views up top (e.g., email view, payor view) to see how the invoice will appear to your client.
Creating an invoice in QuickBooks Online.
My only complaint is the AI-autofill tool on the left. I think it takes up too much space and is frustrating to have to hide.
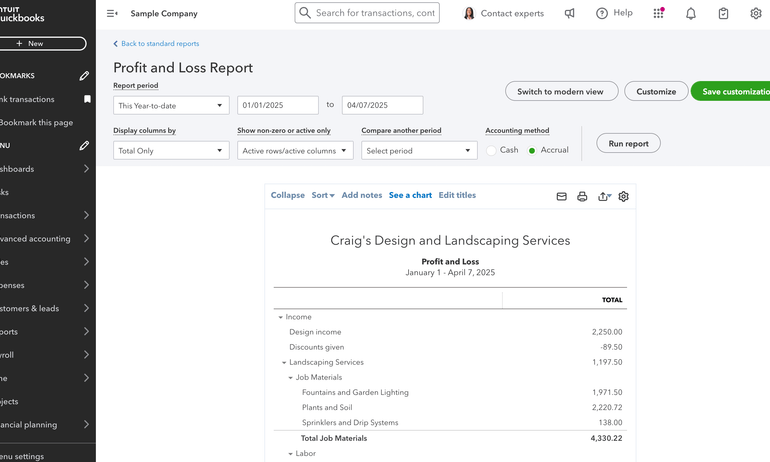
My take: QuickBooks Online’s reporting is one of its greatest strengths.
QuickBooks Online lets you view a list of all available reports and “star” the ones you’d like to appear at the top. To evaluate customization options and readability, I ran the profit and loss report. You can alter dates, add comparison periods and choose how you’d like to display columns.
QuickBooks Online profit and loss report.
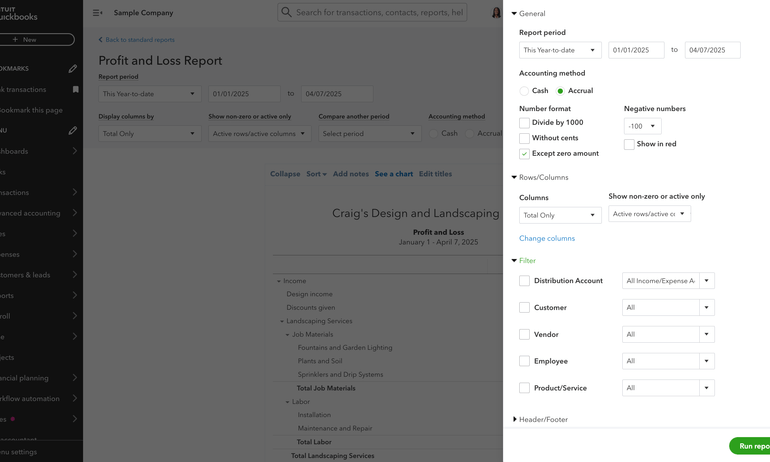
Clicking the “customization” button lets you filter further by categories like customer, vendor, employee and product or service. You can also change the number format, which is nice. These options make QuickBooks Online’s reporting among the most customizable in the industry.
Profit and loss report customization options.
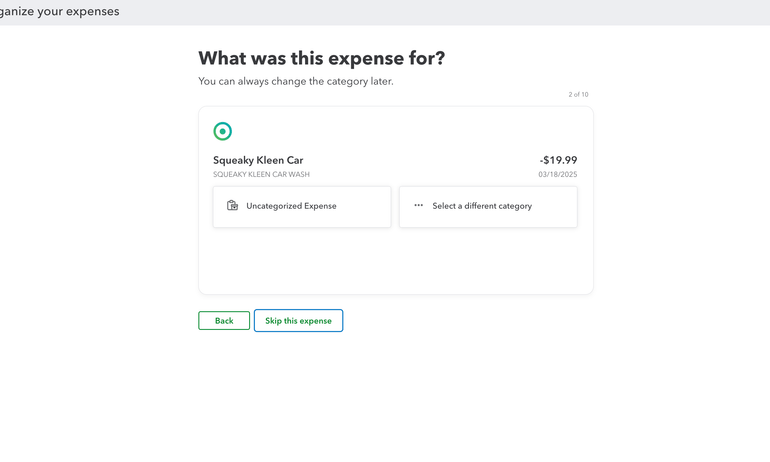
My take: Appropriately thorough.
When you use QuickBooks Online for the first time and click into the “bank transactions” tab, the software prompts you to categorize a handful of your bank feed transactions. Then, it asks you if those types of transactions are always categorized like that. That way, it can learn to suggest the correct categories over time.
Getting started with QuickBooks Online.
Your business’s bank transactions flow into QuickBooks Online via your bank feeds. The software automatically assigns categories to each transaction and requires you to approve them by clicking “add.” This requirement might seem time-consuming, but it can prevent your transactions from being categorized incorrectly. As AI automation tools become prevalent, I think it’s important to keep these safeguards in place.
You can skip that step and have QuickBooks Online automatically add transactions itself. Just create bank rules and give the software permission to “auto-confirm” transactions that match the rules’ descriptions.
Additionally, I appreciate how the software lets you toggle between “business view” and “accountant view” within its settings. I prefer the “accountant view” for looking over bank transactions, because it prominently displays how each transaction has been categorized.
In the “bank transactions” tab, QuickBooks Online also suggests matching certain bank statement lines to existing transactions you’ve already entered into the software. If you click “match,” that transaction is automatically reconciled. This automation is pretty standard across most accounting software products.
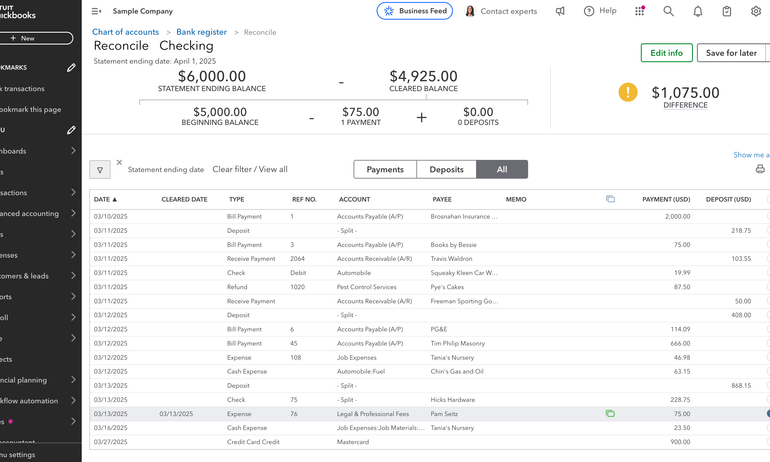
Bank feed transactions that aren’t matched to existing transactions within the software must be reconciled within the “reconcile” tab. To do this, you pull up your bank statement in one tab and double check that each line matches what you’re seeing in QuickBooks Online. If it does, you click the checkmark next to that transaction.
This part of the process is more manual than some competitors, and I’m undecided on whether that’s entirely a bad thing. I’d rather be more involved in the reconciliation process and avoid error than rely entirely on automation.
QuickBooks Online reconciliation.
If you prefer a less manual reconciliation process, you might opt for Xero, which doesn’t require you to pull up your bank statement. Instead, it automatically reconciles each bank statement line as you create a matching transaction for it.
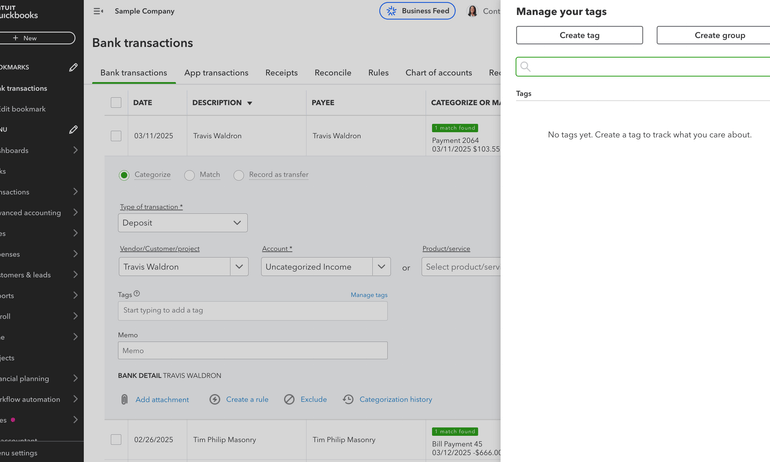
My take: This process is about to look a little different.
QuickBooks Online is phasing out transaction tags after May 16, 2025, and replacing them with custom fields to more granularly categorize transactions. Custom fields are separate from standard account categorizations and allow you to filter reports by differentiators, like department or sales rep.
From what I can tell, transaction tags and custom fields basically serve the same purpose. However, the transition might force more business owners to upgrade their subscription plans. The Simple Start plan used to support up to 40 tag groups. But now, it only supports one custom field.
Right now, QuickBooks Online’s demo account still uses tags as opposed to custom fields. I’ll check back after this new feature launches.
Transaction tracking tags in QuickBooks Online.
My take: Definitely an asset for project-based businesses.
Unlike some competitors, QuickBooks Online includes project tracking tools and provides a dashboard that helps you gauge how each project is performing. The demo account didn’t have existing projects, but you can see how you could use the dash to compare profit margins and project income vs. cost.
QuickBooks Online projects dashboard.
My take: I like the variety of ways you can contact support, but reviews criticize the quality of that support.
To contact support, I clicked the help button, selected “search” and typed in “contact support.” The AI chatbot gave me several options:
Contacting support on QuickBooks Online.
At face value, I appreciate the various ways you can reach customer support. However, users’ overwhelmingly negative reviews focus on the quality of that support, which gives me pause.
How we evaluated QuickBooks
NerdWallet independently reviews accounting software products, like QuickBooks Online, across 10 categories and more than 30 subcategories. We collected the data from QuickBooks Online’s public-facing website and from company representatives.
Our accounting software ratings range from one to five stars overall. But we also score individual features to help business owners understand a product's strengths and weaknesses. Here’s how QuickBooks Online stacks up:
QuickBooks Online is top of the line for the following categories:
Phone support: Phone support is available Monday through Friday from 6 a.m. to 6 p.m. PT and Saturday from 6 a.m. to 3 p.m. PT for Simple Start, Essentials and Plus plan subscribers. Advanced plan subscribers can access phone support 24/7.
Online support: Live chat support is available the same days and hours as phone support.
Help library: Yes, in addition to a community forum.
Double-entry accounting: Yes.
Chart of accounts customization: Yes.
Cash- and accrual-basis reporting: Yes, you can change your accounting method within the software.
Bank reconciliation: QuickBooks Online suggests matching bank feed lines and existing transactions for you. It also suggests categories for bank transactions and allows you to create bank rules to automate the process further.
Bank feeds: You can automatically import transactions from connected bank and credit card accounts.
Dashboard customization: You can choose which modules to add to or hide from your dashboard. You can also select their placement.
Audit trails: Yes.
Bookkeeper certification: Accountants and bookkeepers can go through training to become a certified QuickBooks ProAdvisor.
Accountant access: All QuickBooks Online plans let you invite up to two accountant firm users to collaborate.
Payroll: QuickBooks Online offers its own in-house payroll solution, called QuickBooks Payroll.
POS: QuickBooks Online connects to POS systems like Square, Shopify and Loyverse.
Bookkeeping services: You can pair your subscription with QuickBooks Live, the company’s in-house solution for online bookkeeping assistance.
Additional integrations: QuickBooks Online offers more than 750 integrations total.
Pricing listed on website: Yes.
Free trial period: New customers can choose between a 30-day free trial or 50% discount for 3 months.
QuickBooks Online is great in the following categories:
Reporting: QuickBooks Online has more than 50 reports available in its Simple Start plan alone, including a profit and loss statement, balance sheet and summary, detailed and aging reports. You can filter by date and custom field. The number of custom fields you can create, as well as which reports you can use them on, vary by plan.
Invoicing: You can accept payments online, convert estimates to invoices, customize invoices with logos and terms, and send automatic payment reminders to clients. You can also customize your columns and alter their width. There is no cap on billable clients or invoices.
Inventory: QuickBooks Online’s Plus plan and up includes inventory tracking tools.
Accounts payable: You can automatically import your bills through the QuickBooks Business Network, track them and schedule payments.
Mobile app: You can use QuickBooks Online’s mobile app to photograph and upload receipts, send invoices, view business insights and track mileage.
Project tracking: QuickBooks Online’s Plus plan and up includes project tracking and project profitability tools.
Transaction categorization: In addition to labeling transactions by account, you can create custom fields to separate transactions into different categories. QuickBooks Online’s Plus and Advanced plans also let you use classes to filter even further (e.g., by department).
Industry-specific reports: Available in QuickBooks Enterprise, but not through QuickBooks Online.
QuickBooks Online is decent, but not the best, in the following categories:
User limits: All QuickBooks Online plans let you invite an accountant to collaborate. Beyond that, you can begin adding additional users in the Essentials plan. The user limit tops out at 25 in the Advanced plan.
Capacity to support larger small businesses: Yes. QuickBooks Online’s accompanying payroll software is ideal for up to 50 employees, but can accommodate up to 150 if necessary.
QuickBooks Online is subpar in the following categories:
Monthly pricing: $35-$235 per month.
None of QuickBooks Online’s features received 2 or 4 stars. For the most part, they're either excellent, average or subpar, but not anywhere in between.
Our evaluations also take user sentiment into account. This involves looking through individual reviews and feedback on sites like Trustpilot, the App Store, Google Play and Reddit. Then, we use AI tools to help spot larger trends within those comments. Since we cannot verify each user’s individual experience, we don’t incorporate user reviews in our star ratings.
However, we do test the product ourselves to evaluate commonly mentioned pain points and develop our own objective assessment. For more information on how we score accounting software products, see our full methodology.
Frequently asked questions
The two are often used interchangeably, especially now that QuickBooks Online is Intuit’s primary QuickBooks offering — with most Desktop plans going away after September 2024 and QuickBooks Enterprise remaining the only desktop offering going forward.
You’ll get the most value out of QuickBooks Online if you understand how to use its transaction tags and reporting capabilities. If you’re not sure whether you’re getting the most of these features, consider asking your accountant to review your chart of accounts and how you’re categorizing transactions.
One of QuickBooks Online’s biggest downsides is its price. To access some of the product’s most valuable features, like inventory management and project profitability tracking, you have to subscribe to the Plus plan or higher. Some very small businesses that only need basic income and expense tracking, along with invoicing capabilities, will likely find that a less expensive solution does the trick. Many user comments and reviews note frequent price increases as well as persistent upselling efforts as additional drawbacks to using QuickBooks Online.
QuickBooks has been phasing out its desktop product offerings, with the exception of QuickBooks Enterprise, and encouraging businesses to purchase one of its online products. Intuit will no longer offer QuickBooks Desktop plans to new customers after September 2024, though support and updates will continue for existing customers.